16 KiB
| title | slug | date | tags | ||
|---|---|---|---|---|---|
| Self-hosting: setting up reverse proxy and first service | /self-hosting-3-reverse-proxy-grafana/ | 2025-03-12 |
|
In my previous post in the series I explained how I configured the DNS settings for the server and set up its TLS certificate. I am now in a position to start hosting services.
Architecture
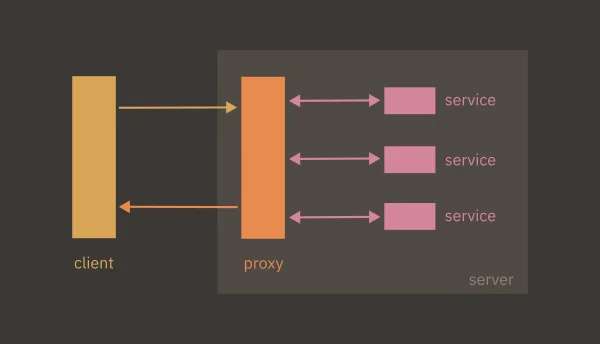
There are three core components to my self-hosting architecture:
- a public subdomain
- a reverse proxy
- software running in Docker containers
I will use this structure for the majority of my services. Let me explain each part.
Subdomain
This is the easiest bit to understand. A subdomain is just an address on a larger server that groups together a set of related processes or resources. For example, on my server, service-a and service-b would be accessible at the following subdomains:
service-a.systemsobscure.netservice-b.systemsobscure.net
To access a given resource over the public Internet, it needs to be reachable via a URL - subdomains provide this in a clear, hierarchical manner.
Back when I set up the
DNS records for the
server, I created an A Record with the wildcard character (*). This means that
I can create multiple subdomains and have them be served off of the main
systemsobscure domain.
Reverse proxy
The subdomain is the public address of the resource or service. Clients will send HTTP requests to this address and to handle them, I need a way to map the public subdomain to the resource on the server that the client has requested. This is the role of the reverse proxy.
A reverse proxy serves as a buffer between the server and the incoming client requests. It inspects the request and directs it to the port of the relevant running process.
Reverse proxies have other uses and advantages - they can be used as load balancers and as a security measure to block certain traffic. However my use will be mostly administrative - directing incoming requests to the right services.
Docker
Docker is fairly complex but I want to go into a bit of detail because I think it is one of the few genuinely innovative technologies of the last couple of decades. It's remarkable how simple it is to use and how quickly you can provision complex resources with just a few lines of configuration.
Docker exploits a capacity native to the Linux kernel: containerisation. Containers allow you to isolate running processes from their specific runtime environment into self-contained virtual runtimes.
All operating system processes ultimately share the same computational resources: memory, disk-space, processor etc. This means that any one process can monopolise those resources at the expense of the others. For example, you might be running software that has hit a bug and as a result it freezes and your mouse movement slows down.
Prior to the advent of containerisation, server management mostly consisted in balancing the competing resource needs of different processes. With containers, you group a set of related processes into an isolated group and assign them a specific amount of virtual memory, disk-space etc. This grouping is partitioned from other processes on the native OS and the container is ignorant of the specific machine it is running on. This means it is confined to its container and cannot unduly affect other system processes. It can also be activated and deactivated, as needed.
You can provision software just as selectively as hardware, using specific runtimes and dependencies as required. This practically eradicates the common issue of conflicts arising between, say, the version of Python you have on your local machine, and the version required by a third-party software. Moreover, as containers are portable - they can, in principle, be shared between machines - you can share software as a container and be confident that it will run on any machine that can leverage containerisation.
This is where Docker comes in. It's a particular implementation of container technology that is designed to simplify and standardise the creation and exchange of containerised software.
A Docker image is a blueprint for creating a specific container. For example, you might use a MySQL image to create a database within your application. The image contains everything necessary to run the application: binaries, libraries, resources, and additional dependencies.
You can combine several images into a single container. In this scenario, you might also include an OS image to manage the different components. These are typically stripped-down versions of common Linux distributions.
Docker images are defined in a declarative file (Dockerfile) that specifies the software to be used, the directory within the container where it should execute, and, usually, an initialisation command.
To demonstrate, the Dockerfile below sets up a basic Python application using
the public python:3.8 image. It transfers source files from a directory on the
local machine into to the container, installs dependencies and then starts the
application:
FROM python:3.8
WORKDIR /app
COPY . /app
RUN pip install -r requirements.txt
CMD ["python", "./my_script.py"]
Docker maintains a public registry of images that you can download and use via the Docker CLI.
Hopefully my intended architecture is starting to become apparent: I will run software on my server using Docker images. Requests will arrive at a given subdomain and the reverse proxy will channel them the port where the Docker container is running.
That's enough background, let's get started...
Grafana
The first service I am going to host is Grafana. This is a good software to start with because it will allow me to easily access server logs and build dashboards that display performance and capacity metrics about the server and the services I'm running.
I am going to host Grafana at the grafana.systemsobscure.net subdomain and, as
explained, I will run it as a Docker container.
Code management
All of my services will live in a single monorepo on GitHub. This simplifies deployment. I will configure the software in this repository on my local machine and test it on a local server. Then, when I want to deploy , I'll simply push my changes to the remote and pull them down to the production server over SSH.
To manage each service I will use a Docker Compose file. This is just a more
elaborate Dockerfile that you use to manage multi-container Docker applications
that require more advanced functionality than a single container can provide.
For example, when you have multiple containers, they may need access to a shared
storage device and shared network in order to communicate. You define all this
in the Docker Compose then use a single command (docker compose up) to start
all the processes.
The directory structure of the monorepo is as follows:
├── proxy
│   └── nginx
│       ├── conf.d
│       │   └── grafana.conf
│       └── docker-compose.yml
└── services
    └── grafana
        ├── docker-compose.yml
        ├── prometheus
        │   └── prometheus.yml
        ├── promtail
        │   └── promtail-config.yml
        └── README.md
Each service will have its own subdirectory (for example grafana/ ) containing
a Docker Compose file that configures the software. Certain images within the
Docker Compose (eg. prometheus, promtail) may require custom configuration
in addition to the Docker Compose file - this will be handled in a dedicated
config file, e.g. prometheus/prometheus.yml.
Building the Grafana Docker container
I don't want to get too bogged down in the details of how I set Grafana up, as my objective in this pose is to demonstrate the generic architecture. However a few parts require clarification.
Grafana itself is a sort of parent to different tracking and logging tools. It provides an integrated interface for a wide variety of tools and you only install the ones you wish to use.
Each of these sub-services require their own Docker image in addition to the Grafana Docker image. I will be using the following:
- Loki
- To display server logs
- Promtail
- For collecting logs on the host server
- Prometheus
- Backend service that presents the Grafana frontend with data and which can be queried
- Node Exporter
- A service that can be used by Prometheus to gather hardware and OS metrics about the host environment
In /services/grafana/docker-compose.yml, I create an entry for each service
(including Grafana itself) specifying the image I want to use:
services:
  prometheus:
    image: prom/prometheus:latest

  node-exporter:
    image: prom/node-exporter:latest

  loki:
    image: grafana/loki:latest

  promtail:
    image: grafana/promtail:latest

  grafana:
    image: grafana/grafana:latest
    container_name: grafana
Certain containers are going to require their own Docker volumes. A Docker volume is a form of persistent virtual storage within the container for storing application data. This will be necessary for Prometheus, Loki, and Grafana so I add the following to the Docker Compose:
volumes:
  prometheus_data:
  loki_data:
  grafana_data:
This establishes the volumes, then for each image I specify a volumes field
that maps the volume to the requisite directory within the container:
grafana:
  image: grafana/grafana:latestki
  container_name: grafana
  volumes:
    - grafana_data:/var/lib/grafana
The Grafana application will look for its data at /var/lib/grafana at runtime,
hence the volume is mapped to this location.
In addition to volumes, I need to provision Docker networks. I need a network
because the individual applications will need to be able to communicate with
each other and the grafana container - which is the parent of the other
applications - will need to communicate with processes outside of itself.
Namely, the reverse proxy that will connect client requests to the Grafana
service.
The following section of the Compose file specifies two networks for this
purpose: default which runs internally within the the container, and web
which is external to the container which grafana and other separate Docker
containers will be able to hook into:
networks:
  default:
  web:
    external: true
Then in my grafana declaration, I specify its membership of these networks:
grafana:
  image: grafana/grafana:latestki
  container_name: grafana
  ports:
    - "3000:3000"
  environment:
    - GF_SECURITY_ADMIN_PASSWORD=${GRAFANA_PASSWORD}
  volumes:
    - grafana_data:/var/lib/grafana
  networks:
    - default
    - web
You'll notice I also include an environment variable for the password. This will
be injected automatically via the presence of a .env file on the server
containing the password.
Additionally I specify port 3000 for Grafana to run on. This will be important
later when I connect it to the reverse proxy.
Deploying the container
I'm now ready to pull the changes from the server and test out the container in the live environment.
Once I've SSH'd into the server I install Docker:
sudo apt install docker-ce docker-ce-cli containerd.io docker-buildx-plugin docker-compose-plugin
I clone my monorepo on the server and then cd into the /services/grafana
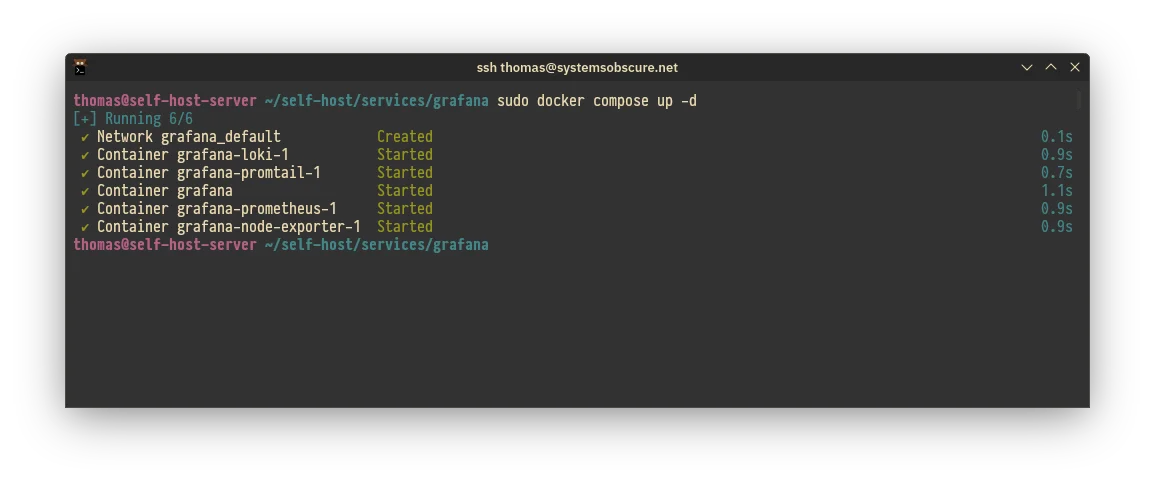
directory and run the Docker Compose start script:
docker compose up -d
The containers comprising the Docker Compose start fine:
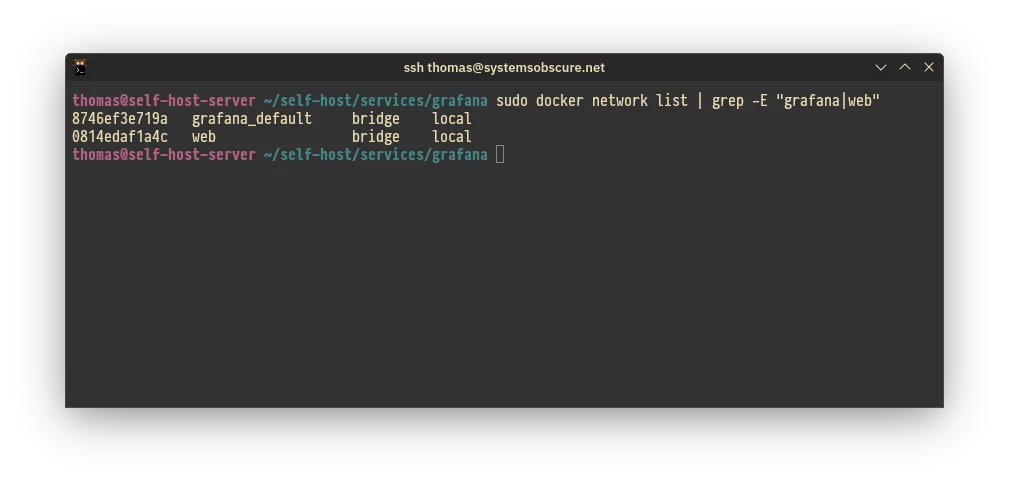
I also confirm that the two networks associated with Grafana (web and
default) are running as expected:
nginx
So far I have succeeded in getting my grafana container up and running on port
3000 but I have no way yet of accessing its frontend. To do this I need to set
up and configure the reverse proxy.
I'll use nginx for this and I'll also run this as a
Docker service, configured in the proxy/ directory of the monorepo that I
demonstrated earlier.
As with Grafana, everything necessary is detailed in the Docker Compose:
# proxy/nginx/docker-compose.yml

services:
  nginx:
    image: nginx:latest
    ports:
      - "80:80"
      - "443:443"
    volumes:
      - ./conf.d:/etc/nginx/conf.d
      - /etc/letsencrypt:/etc/letsencrypt:ro
    restart: unless-stopped
    networks:
      - web

networks:
  web:
    external: true
Key points to note:
nginxwill have access to the sharedwebDocker network that we saw earlier when configuring Grafana. This will enable it to communicate with other Docker services.- I pass through the actual location of my TLS certificates on the server
(
/etc/letsencrypt) to the nginx container, specifying that they are read only. This is a bit different to Grafana where we were mapping virtual Docker volumes to locations within the container. - I map both the server's HTTP (
80) and HTTPS (443) ports through to the equivalent ports in thenginxcontainer.
For each Docker service that nginx will proxy, I need to provide a
configuration file within the nginx/conf.d directory. (These too are copied
into the container.)
The core process is quite simple. You specify:
- The port you want
nginxto listen to - The specific subdomain being requested on that port
- The location of the running server process to which you want to direct the incoming request
To demonstrate with the Grafana config file:
# proxy/nginx/conf.d/grafana.conf

server {
	listen 443 ssl;
	server_name grafana.systemsobscure.net;

  location / {
	proxy_pass http://grafana:3000;
  }
}
This is the basic idea. In fact it's a bit more complicated because we need to
enforce HTTPS and make it such that grafana.systemsobscure.net is only served
over HTTPS.
To do this I specify the location of my TLS certificate and set the necessary response header:
# proxy/nginx/conf.d/grafana.conf

server {
	listen 443 ssl;
	server_name grafana.systemsobscure.net;

    ssl_certificate /etc/letsencrypt/live/systemsobscure.net/fullchain.pem;
    ssl_certificate_key /etc/letsencrypt/live/systemsobscure.net/privkey.pem;

    add_header Strict-Transport-Security "max-age=31536000; includeSubDomains" always;

    ...
}
This is fine so long as people always use https://grafana.systemsobscure.net
but of course they won't always do this, so we need to redirect any requests to
the HTTP port (80) to the HTTPS service. This is achieved with a simple 301
redirect in the same file:
server {
	listen 80;
	server_name grafana.systemsobscure.net;
	location / {
		return 301 https://$host$request_uri;
	}
}
Now any requests to grafana.systemsobscure.net will automatically be served at
https://grafana.systemsobscure.net.
The final step is to start the nginx container:
cd proxy/nginx
docker compose up -d
Results
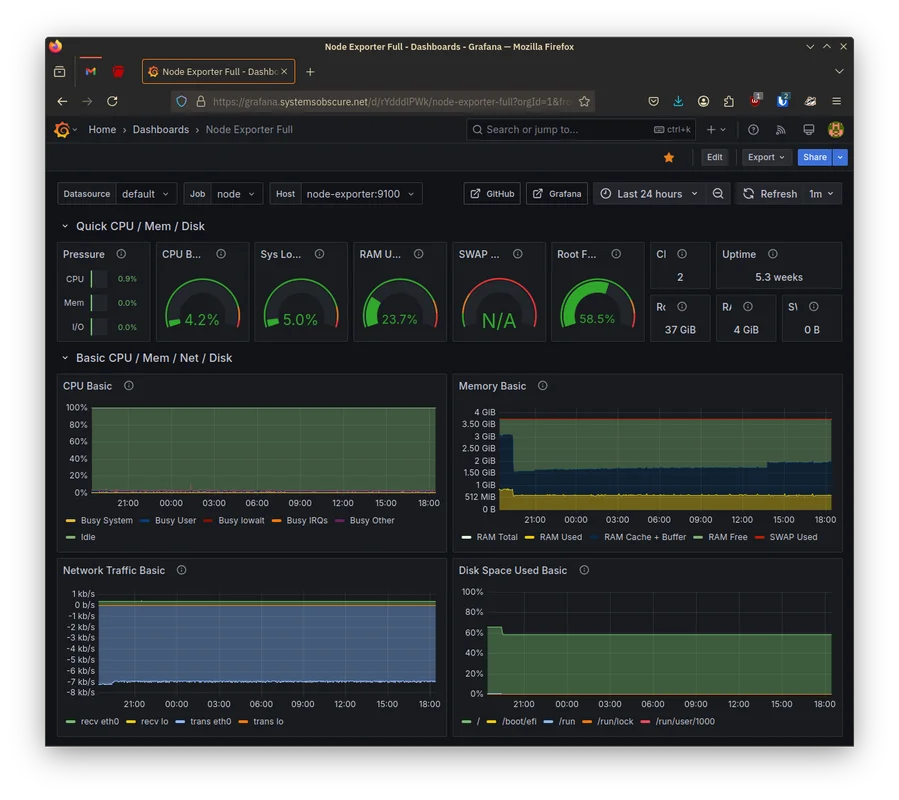
With the Grafana container running and the reverse-proxy configured we can
finally navigate to https://grafana.systemsobscure.net and check out the live
service!

Once I've logged in, I use a Grafana template code to create a default template that outputs the system metrics provided by the Node Exporter service:
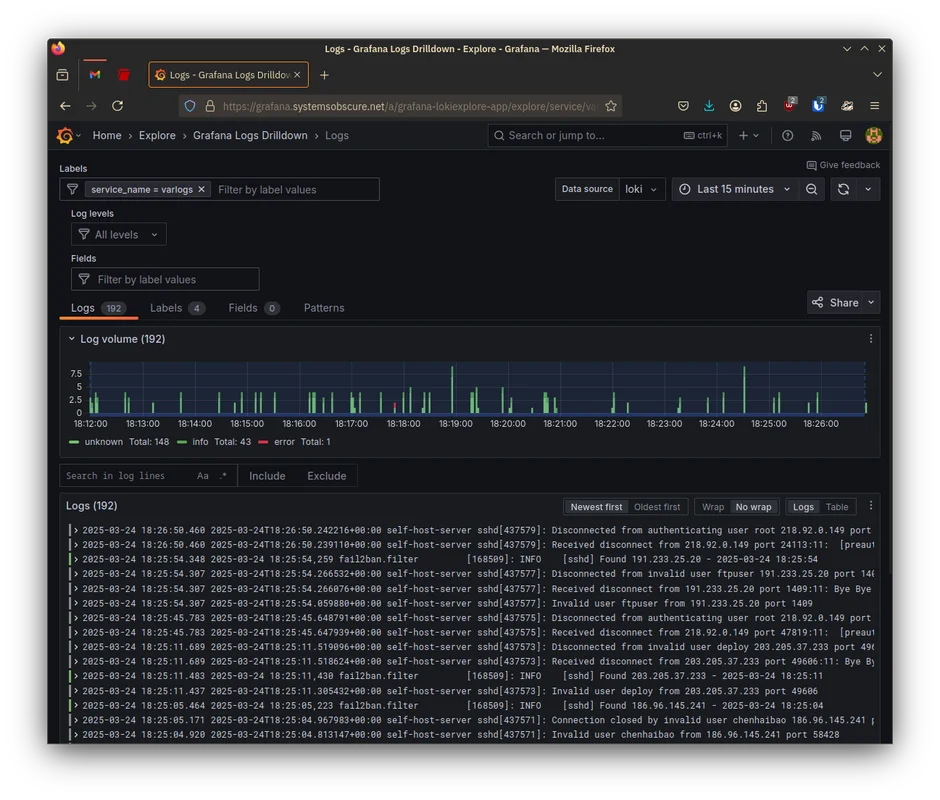
I can also go to Loki and look at the server connection logs and track the
activity of the fail2ban software I installed in the last post:
Later, when I have additional services, I'll add additional dashboards and Loki queries so I can analyse everything that is going on.
Resources
In researching how to do the above, I created or expanded the following entries in my Zettelkasten: